Raspberry Pi Kodi Mediaplayer Box
 UP Board Kodi Mediaplayer Box
 MinnowBoard Turbot little Server / Kodi Mediaplayer Box
 Raspberry Pi UMTS Mobil Project
 Raspberry PI - Useful hardware and accessories
 Raspberry Pi + TFT IPS Displays + Raspberry Pi OS
 Raspberry Pi + Kodi Media Center + Raspberry Pi OS
 Raspberry Pi startup scripts
 Harddisk for Raspberry Pi & Co.
 Raspberry Pi + Display Waveshare LCD 1024×600 HDMI Touch
 Handbrake bug - Old MP4 videos with MP3 audio
Downward compatibility to USB 2.0
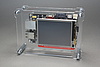
Case for single-board computer (SBC) with similar GPIO positioning
like Raspberry Pi 4 B, ODROID-C4, ROCK PI 4 B, UP-Board, Tinker Board
like Raspberry Pi 4 B, ODROID-C4, ROCK PI 4 B, UP-Board, Tinker Board
2.5 inch hard disks are available in different sizes with 2TB, 3TB and even 4TB, mostly as external source with USB 3.0 connection. The Western Digital (WD) hard drives are best suited for single board computers as they are downward compatible to USB 2.0 (max. 500mA) and therefore do not require an additional power source or Y-cable. WD also offers the so-called WDLabs PiDrive Devices for the Raspberry Pi 4 B & Co.
Most hard disks are delivered "ready to use" with a partition in NTFS format and must be reformatted as follows.
pi@raspberrypi:~ $ sudo fdisk -l
...
Disk /dev/mmcblk0: 7.5 GiB, 8010072064 bytes, 15644672 sectors
...
Device         Boot Start      End  Sectors  Size Id Type
/dev/mmcblk0p1       8192    93813    85622 41.8M  c W95 FAT32 (LBA)
/dev/mmcblk0p2      94208 15644671 15550464  7.4G 83 Linux

Disk /dev/sda: 292.5 GiB, 314038026240 bytes, 613355520 sectors
...
Device     Boot Start       End   Sectors   Size Id Type
/dev/sda1        2048 613355519 613353472 292.5G  7 HPFS/NTFS/exFAT
pi@raspberrypi:~ $ sudo fdisk /dev/sda
...
Command (m for help): p
Device     Boot Start       End   Sectors   Size Id Type
/dev/sda1        2048 613355519 613353472 292.5G 83 Linux
Important: All data will be lost irrevocably!
Commands:
pi@raspberrypi:~ $ sudo mkfs.ext4 -L NEW_HDD_NAME -E lazy_itable_init=0,lazy_journal_init=0 /dev/sda1
This formatting avoids the "ext4lazyinit" process, which consumes a low I/O bandwidth (approx. 11-13 Mb/s) in idle mode. You see it if the LED is continuously flashing, but the hard disk not being read or written.


To mount hard disks permanently, you can put the above mount command in a start script or enter it into the fstab file. To avoid confusion with multiple hard disks, the device specification (/dev/sda1) should be replaced with the UUID (UUID=59d68b0d-663a-47af-8498-963f61cfbc3d).
pi@raspberrypi:~ $ sudo blkid -o list
device               fs_type   label      mount point              UUID
-------------------------------------------------------------------------------------------------------
/dev/mmcblk0p1       vfat      boot       /boot                    B60A-B262
/dev/mmcblk0p2       ext4                 /                        9a7608bd-5bff-4dfc-ac1d-63a956744162
/dev/mmcblk0                              (in use)
/dev/sda1            ext4      TESTHDD    (not mounted)            59d68b0d-663a-47af-8498-963f61cfbc3d
pre-shutdown.sh Datei erstellen:
pi@raspberrypi:~ $ nano pre-shutdown.sh

#!/bin/bash
sudo umount /mnt/HDD1
sleep 10

pi@raspberrypi:~ $ chmod +x pre-shutdown.sh

pi@raspberrypi:~ $ sudo nano /etc/systemd/system/hdd-shutdown.service

[Unit]
Description=Pre-Shutdown Processes for HDD
DefaultDependencies=no
Before=shutdown.target

[Service]
Type=oneshot
ExecStart=/home/pi/pre-shutdown.sh

[Install]
WantedBy=reboot.target shutdown.target

pi@raspberrypi:~ $ sudo systemctl daemon-reload
pi@raspberrypi:~ $ sudo systemctl enable hdd-shutdown.service
pi@raspberrypi:~ $ sudo systemctl start hdd-shutdown.service